TP-LINK TL-WR720N V1.00 - DIY external Wi-fi antenna

First of all, I exagerated in the title. Installing an external Wi-fi antenna on a Wi-fi router, access point or USB adapter is only one part DIY and 2 part store bought not too cheap components.

In order to significantly boost the performance and range of a Wi-fi router, which has only internal antennas, you need at least 5dBi external wi-fi antennas, as the internal ones are usually just 2-3dBi:

Sunch an antenna can cost around 10 USD, but you can also find some kits (2 x 5dBi antennas and 2 adapters), which cost a lot less:


Long story short, the DIY part of the upgrade requires you to make holes on the router's case for the adapters and connect or solder the smaller plug in the right place on the logic board.
For the TP-LINK TL-WR720N V1.00 i had to remove the internal mini-antenna, cut the adapter's small plug and solder the cable directly in the antenna's place on the board:


I used one 5dBi antenna, as this router only supports one. Honestly I didn't get any speed improvements in the room, but in the bathroom and backyard I got a significant signal boost. Even though the wall is 30cm thick and made of full bricks, I get full signal strength and speeds around 70Mbps download and 25Mbps upload (this is the maximum upload speed of my internet connection). Before I installed the antenna, I used to get 2-3 bar signal strength and around 34Mbps download / 14Mbps upload speed.

Even though this is a significan improvement, it's not the best way to achieve it, in the sense that the TL-WR720N V1.00 router is not the best candidate for this upgrade. V2.00 has been out for quite some time, which has a preinstalled external antenna and in fact costs less...

The antenna upgrade makes sense only if you have a very good router, which meets all your needs, except for the Wi-fi signal strength and speed. The same goes for access points and USB adapters - you can buy really cheap ones with strong external antennas, but if you already have a good one, it may be worth your while to upgrade the antenna(s).

NOTE: keep in mind that for different frequencies and standards you may need different kinf of antennas: 2.4GHz vs. 5GHz; N standard vs. AC standard ....etc.

How's the Internet in Romania (EU)?

I've seen a lot of top 10 lists of countries with the best internet speeds, we're present in some of them - in others we're not, but there are two main things about our ISP's that are constant:
  1. the prices are very low even for businesses
  2. there's no data cap an any cable/fiber Internet connection since 2004
Personally I had a "business" internet connection (shared it in our neghbourhood network) way back in 2003-2004, when speeds were at 512Kbps for business and 256kbps for home users. The price of the subscription was around 100 USD, even though the speed was only double of the home user connection, which had a 30 USD price. The difference in the Internet experience however was very noticeable, as the business connection had an amazing response time and supported multiple simultaneous downloads without locking up browsing for others. I had it for only a couple of months, because there were some issues with the neighbourhood association and had to cut our network in half. We ended up with a 2MBPS DSL connection for half the price ... 2 years after that everybody signed individual contracts with a local ISP called RCS-RDS, which now is rebranded to DIGI. We each got 10Mbps for about 10USD, and -get this- it was installed via FTTB (fiber to the building) in 2005. Since then the prices remained the same, the optic fiber remained the same, but the equipment was upgraded to allow (down/up) 100/100 for 7USD, 500/200 for 10USD and 1000/200 for 11USD.

Unfortunately I'm stuck now with a Comcast-like provider, called UPC Romania, for two more years. While RCS-RDS always upgraded the connection speed automatically whenever they upgraded the infrastructure (even if you still had 1 year left on the previous contract), with UPC you always have to fight (sometimes dirty) to get the best deal. If you don't actively check their special offers and complain about it periodically, then you wake up one day with a 20Mbps connection on a 4 year old contract, even though you could have gotten 500Mbps for the same price 2 years ago.

My current service package is as follows:


  1. Fiber Power 500/25 Internet - no data cap
  2. UPC CONNECT BOX Wi-fi router with 4 Gigabit ports (capable of 500Mbps through the AC standard)
  3. 110 digital channels
  4. Panonia package = 18 Hungarian channels
  5. SD DVR receiver
  6. Phone line with unlimited (free) land line minutes in the EU, USA, Canada and Israel (unlimited mobile minutes too in the USA, Canada and Israel)
  7. additional SD receiver
For this package I pay 70Lei, about 18USD, which is around 4% of the national average (net) income 1900Lei, or 475USD.

About the Fiber Power ...


As you can see, I have nothing to complain about, except for the fact that my PC is not fast enough to download torrents at the max speed. My Celeron G1820 with 4GB DDR3 and 60GB Kingston SSD can only download torrents at 22MB/s max., even though the real maximum download limit is around 55MB/s.

In the video above you can see that the speed test goes up to 500Mbps, and FTP/HTTP downloads also work at max speed, so the only problem is with torrents, which require processing power in order to assamble the files from millions of parts downloaded from many different sources.

Almost forgot, I do have something else to complain about: the crappy CONNECT BOX router modem! When you first start it up, it works great, wi-fi and everything, almost any website loads in 2 seconds max, but after a couple of days the reaction speed goes to crap, as some local (Romanian) websites load in 10 seconds or don't load at all.


My solution for this was to disable the router part of the modem. I don't know for how long I will be able to use it like this, because now every PC, phone and tablet in my house gets a real IP address and the reaction speed is incredibly fast. Even though IP adresses are allocated dynamically, I don't think they are going let me use 5 addresses on average, instead of just one (in standard router mode).

I'm hoping to switch to DIGI soon, as they have FTTH infrastructure at my address, so I'll be able to get 300/100Mbps for just 28Lei (7 USD). Until then I'll have to put together a computer to act as router, because I don't trust these small crappy boxes, supplied by the ISPs.

The other change I'll have to make is to get a 4G smartphone, because DIGI recently modified the data caps from 3GB (3G + 4G traffic) to 3GB on 3G and 30GB on 4G, even on the cheapest contract (2EURO = ~2.25 USD), which I currently use with a 3G phone.

Gigabyte BRIX updated to Skylake, Thunderbolt 3, USB 3.1

Gigabyte BRIX is a product family launched by the famous motherboard manufacturer a long time ago, right around the time Intel launched its first NUC (Next Unit of Computing) computers, which are basically very small form factor desktops, based on laptop components.


The latest lineup of BRIX barebone (barebone = no preinstalled RAM / HDD) computers features two different Skylake processor models: Core i5-6200U and Core i7-6500U. These two models are pretty much the same thing, both are Dual Core parts with HyperThreading, TurboBoost 2.0 and integrated graphics Intel HD Graphics 520. The only differences are in pricing and frequencies: 
  • price: $281 vs. $393
  • base frequency: 2.3GHz vs. 2.5GHz
  • turbo frequency: 2.8GHz vs. 3.1GHz
  • iGPU frequency: 1.00GHz vs. 1.05GHz
These differences result in a 10% performance increase in the Core i7-6500U model: 3901 vs. 4332 Passmark points.


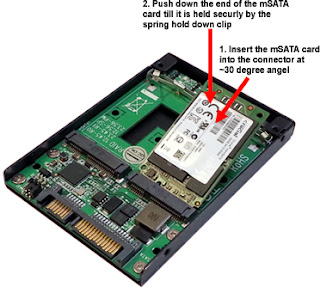
These new Gigabyte BRIX barebones come in two sizes, as you can see in the picture above. The one on the left (GB-BSi5T-6200 and GB-BSi7T-6500) comes with an M.2. slot for storage, while the one on the right (GB-BSi5HT-6200 and GB-BSi7HT-6500) also features a SATA-3 2.5" laptop hard drive bay for additional cheap storage, or up to two more SSDs. YES, like in laptops, you can install two M.2 or mSATA SSDs in one 2.5" bay, by using an adapter.


The ports on both type of barebones are the same. Audio in/out and two USB 3.0 ports on the front.


On the back there is the CPU cooler exhaust (the intakes are on the sides), a Gigabit LAN port, mini DisplayPort, USB 3.1/Thunderbolt 3 (COMBO), HDMI and the DC power plug.


On the right side there are two more USB 3.0 ports and an SD memory card reader.

While it's reassuring to see faster and faster small desktop computers, equipped with all kinds of ports, personally I don't see any practical use for the ThunderBolt port.

Yes, ThunderBolt can be used to attach high speed storage arrays, external graphics card boxes and monitors (with USB 3.0 and audio ports carried through a single ThunderBolt cable), but what good are these external devices if the fastest processor, the Core i7-6500U, is barely faster than a desktop Skylake Core i3?

Well, a desktop Core i3 from the Skylake generation can do a bit of gaming, so you might use the Thunderbolt port to connect a graphics card box, equipped with a mid-range video card. While the latest desktop Core i3-6100 can run multi-threaded games much better than previous generations, they are maxed out, when trying to run any demanding game in 4K.

Here's a video from DigitalFoundry, which shows what you can expect if you buy the most expensive Gigabyte BRIX and an external graphics box with a Titan X in it:


Long story short, what they should have done, is put a Quad Core Skylake Mobile chip, like the Core i7-6700HQ, into the mini desktops... otherwise it's just a cool multimedia/office PC, which can be connected to at least two 4K monitors with non-3D purposes.

As for the high speed external storage devices ... I guess you could copy from them really fast onto the internal SSD, but that's it. These low power processors are not really meant for 4K video editing or any serious operations with large files.

Delidding just got a lot easier

When I got my first Haswell processor, I was surprised to see how much hotter it is than my old Core 2 Duo, even though the E3200 has a 65W TDP on 45nm technology, while my new Celeron G1820 is offically at 53W max. on 22nm technology.

Of course the TDP wasn't the problem. So I searched on-line and saw what others were experiencing with high-end Haswell CPUs, and how they fixed it, so I applied the razor delidding method on my Celeron. I cleaned the surfaces, applied some cheap OEM thermal paste, glued the lid back on and instantly got a 10 degree improvement in cooling. From 63-65 degrees Celsius I got the CPU down to just around 50 degrees (under load). This is way more acceptable, but still not as good as the old Core 2 Duo with the soldered lid, which never goes above 45 degrees C (in the same conditions, same cooler: Cooler Master Hyper TX2).


When I first saw this photo I realized how much time and effort I wasted ... when I could have easily put together something similar to this tool, as I have a lot of carpentry - and electronics tools laying around.

This tool was designed by the guys at Rockit Cool. It is pretty much fool proof, as it lets the lid move just as much as it needs to, in order to break loose and not hit the processor die or any of the surface mounted components (no longer present on SkyLake processors).

How do you use it, exactly?

1. You place the chip in the bottom part, with the lid side up.
2. Reset the top part by unscrewing the shiny screw and moving the shiny piece of metal all the way back
3. Screw together the two parts with the three thumbscrews, reasonably tight.
4. Tighten the shiny metal screw until you hear a popping sound

After you unscrew the three thumbscrews and take out the processor, you do all the usual stuff you'd do after any delidding:

1. Remove/clean the crappy thermal paste and black adhesive from both the CPU and lid
2. Put in new thermal paste, a rice-size droplet
3. Use flexible, slow-drying adhesive (ex. Shoe Goo) to glue the lid back on
4. Install the processor into the LGA socket until the glue dries

How do I center the CPU lid when I glue it on and place it in the socket?

When installing the CPU into the LGA socket, the cover grips the two sides of the CPU lid and tries to push it forward as you pull down the lever into place. When the lid is glued on, no problem, the top part of the socket simply slides forward, leaving the CPU lid in the right position, but what do you do when it's not glued on or the glue didn't dry yet?

I'm sure somebody else thought of this too.


My solution is to loosen the front screw, so the top part of the socket doesn't grip the CPU when it slides into place. After the CPU is in its place and the lever is down, you tighten the screw, and everything's wonderfully centered and held down in the right position.

Installing the freshly glued CPU into the socket is essential, because the pressure will spread the thermal paste to the thinnest layer possible. Letting the glue dry without pressure, will most likely leave a bigger gap (filled by the termal paste) between the CPU and metallic cap, thus reducing cooling efficiency.

NOTE: Depending on motherboard type and socket screw length, you may have to loosen the other two screws too, in order to install the CPU comfortably.
NOTE2: Once the CPU is safely installed into the socket, feel free to assamble and start the PC.
NOTE3: Delidding by any method voids the CPUs warranty

Windows 10 for less than RETAIL price? Can it be legal?

YES. YES. Windows 10 Pro OEM costs around 30USD at Kinguin.net.


Kinguin.Net is an on-line marketplace for games, but other software as well. The company is based in Hong Kong and the sellers on the website can be from anywhere. They sell only product keys, which are delivered to buyers via E-mail, but keep a copy in the buyer's account (probably in the seller's account too) on Kinguin.net.


Kinguin.net guarantees that all product keys are genuine and are only sold once, to one buyer. They also offer a 30 day money back guarantee called "buyer's protection", which costs 1USD / 1EURO (depending on the region of the buyer).

NOTE: the most important thing to verify before buying a product key from Kinguin.net is the regional limitation, which should look like: Regional limitation OR locked to your region.

Personally I have bought 2 Microsoft Windows licenses about a month ago: Windows 10 Pro OEM for myself and Windows 8 Pro OEM for my girlfriend. They were both at about the same price. My PC is based on Haswell platform with 6GB RAM, that's why I chose Windows 10, but my gf has only a Celeron E3200 (Core 2 Duo generation) with 4GB RAM, so I thought there could be compatibility issues with Windows 10 and went with 8.1 instead.

On my PC I installed Windows 10 PRO from a USB stick (the image requires only about 3.2GB space on the flash drive), introduced the product key from the scanned sticker they sent me, and it installed without any problems on my Kingston V300 60GB SSD in about 15 minutes.

On my girlfriend's PC the installation was much slower, even though she has a 120GB Patriot Blast SSD (connected to SATA2) and 4GB DDR3-800MHz RAM in dual channel mode, the processor only scores about 1400 points in Passmark, so it's half as fast as my Haswell Celeron G1820, which scores 2800 points in Passmark and has SATA3 with AHCI.

Upgrading to Windows 10 can be reversed in 30 days, so I tried it on my girlfriend's computer. It took about 2 hours to upgrade, but the result was unexpected. It installed and activated without any problems and even automatically installed drivers for the outdated ATI Radeon 5450 1GB video card (and for everything else). To reduce the boot time, a played around a bit with the page file and hiberfile, and found that the optimal choice is to leave hibernation on and the page file off. Now the PC boots in about 10 seconds (measured from after the POST/BIOS LOGO screen). Needless to say my girlfriend is very pleased, as she was used to Windows 8.1, which needed about 40 seconds to boot up for whatever reason.

In conclusion, I recommend upgrading to Windows 10, even if you have a Celeron from the Core 2 Duo generation (or newer). They are all dual core processors and offer impressive performance at rock bottom prices, assuming that you install sufficient RAM and an SSD. Kinguin.net is the best choice if you have to buy a lot of licenses, or simply don't have the 100 USD for a retail license, but want to enjoy all the advantages of an activated and updated Windows OS.

UPDATE1:

A month after I purchased my Windows 10 license, my PC burned down, except for the SSD. I replaced the motherboard with an ASUS H81M-K (same chipset as my old Asrock H81M-DGS 2.0), bought the same Celeron G1820 processor, 4GB DDR3 RAM and a new cheap PSU.

I was worried about Windows not accepting the configuration change, but everything was absolutely OK. When I first booted the new system, the message "updating devices" appeared under the Windows loading logo. After it finished loading and I logged in, Windows kept bugging me about my Microsoft account, so I clicked on the message. It loaded the Microsoft account page, and instructed me to verify/update my account details, that's it. I didn't really change anything, just clicked save, and everything went back to normal. My Windows is activated and fully functional - I didn't even have to reinstall it with the new configuration.